Kubernetes
Kubernetes is a container orchestration platform. The origin of Kubernetes lies somewhere in the Google data centers where Google's internal container orchestration, Borg, was born. Google used Borg for many years to run its applications. In 2014, Google decided to transfer its experience with Borg into a new open source project called "Kubernetes" (Greek for "helmsman" or "pilot"). In 2015, it became the first project donated to the newly founded Cloud Native Computing Foundation (CNCF).
Kubernetes is a platform for running containers. It takes care of starting your containerized applications, rolling out updates, maintaining service levels, scaling to meet demand, securing access, etc. The two core concepts in Kubernetes are the API, which you use to define your applications, and the cluster, which runs your applications. A cluster is a set of individual servers that have all been configured with a container runtime like Docker and then joined into a single logical unit with Kubernetes.
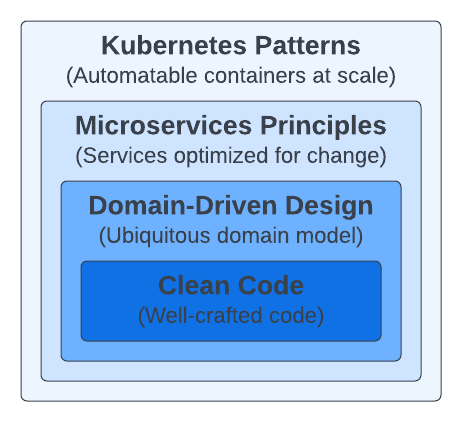
Figure 1 shows the mixture of the skills required for creating suitable cloud-native applications.
Containers and cloud-native platforms bring tremendous benefits to your distributed applications, but if all you put into containers is rubbish, you will get distributed rubbish at scale.
Multiple abstractions in a cloud-native application at a high level require different design considerations.
- At the code level, every variable you define, every method you create, and every class you decide to instantiate plays a role in the long-term maintenance of the application. No matter what container technology or orchestration platform you use, the development team and the artifacts they create will have the most impact.
- Domain-Driven Design is about approaching software design from a business perspective to keep the architecture close to the real world. This approach works best for object-oriented programming languages, but other good ways are to model and design software for real-world problems. A model with the right business and transaction boundaries, easy-to-consume interfaces, and rich APIs is the foundation for successful containerization and automation later.
- The microservices architectural style quickly became the norm, providing valuable principles and practices for designing changing distributed applications. Applying these principles lets you create optimized implementations for scale, resilience, and pace of change, which are standard requirements for any modern software today.
- Containers were quickly adopted as the standard way of packaging and running distributed applications. Creating modular, reusable containers with good cloud-native citizens is another fundamental prerequisite. With a growing number of containers in every organization comes the need to manage them using more effective methods and tools. Cloud-native is a relatively new term to describe principles, patterns, and tools to automate containerized microservices at scale. We use cloud-native interchangeably with Kubernetes, the most popular open-source cloud-native platform available today.
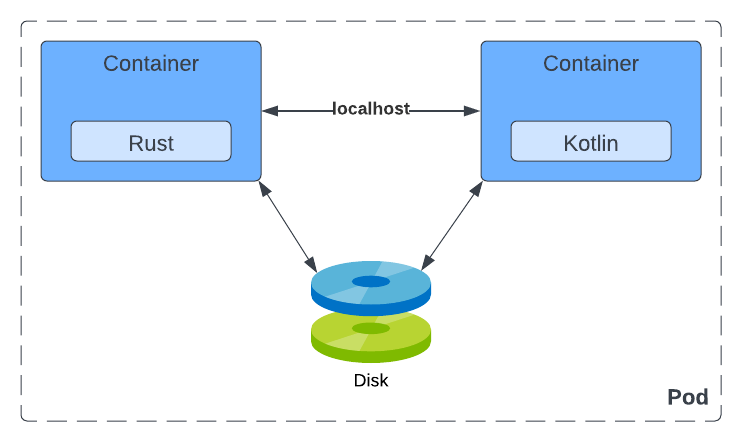
A Pod is an atomic unit of scheduling, deployment, and runtime isolation for a group of containers. All containers in a Pod are always scheduled to the same host, deployed together for scaling or host migration purposes, and can share filesystem, networking, and process namespaces.
The joint lifecycle allows the containers in a Pod to interact with each other over the filesystem or through networking via localhost or host interprocess communication mechanisms if desired (for performance reasons, for example).
The only way to run a container is through the Pod abstraction. Sometimes a Pod contains more than one container.
Containers and Pods and their unique characteristics offer new patterns and principles for designing microservices-based applications.
- A Pod is the atomic unit of scheduling. That means the scheduler tries to find a host that satisfies the requirements of all containers that belong to the Pod. If you create a Pod with many containers, the scheduler needs to see a host with enough resources to satisfy all container demands combined.
- A Pod has an IP address, name, and port range shared by all its containers, and that means containers in the same Pod must be carefully configured to avoid port clashes.
A Pod is the atom of Kubernetes where your application lives, but you don't access Pods directly - that is where Services enter the scene.
Pods are ephemeral - they can come and go at any time for all sorts of reasons, such as scaling up and down, failing container health checks, and node migrations. A Pod IP address is known only after it is scheduled and started on a node. A Pod can be rescheduled to a different node if the existing node it is running no longer healthy. All that means is the Pod's network address may change over the life of an application, and there is a need for another primitive for discovery and load balancing.
That's where Kubernetes Services come into play. The Service is another simple but powerful Kubernetes abstraction that permanently binds the Service name to IP addresses and port numbers. So a Service represents a named entry point for accessing an application. In the most common scenario, the Service serves as the entry point for a set of Pods, but that might not always be the case. The Service is a generic primitive, and it may also point to the functionality provided outside of the Kubernetes cluster. The Service primitive can be used for Service discovery and load balancing and allows altering implementation and scaling without affecting Service consumers.
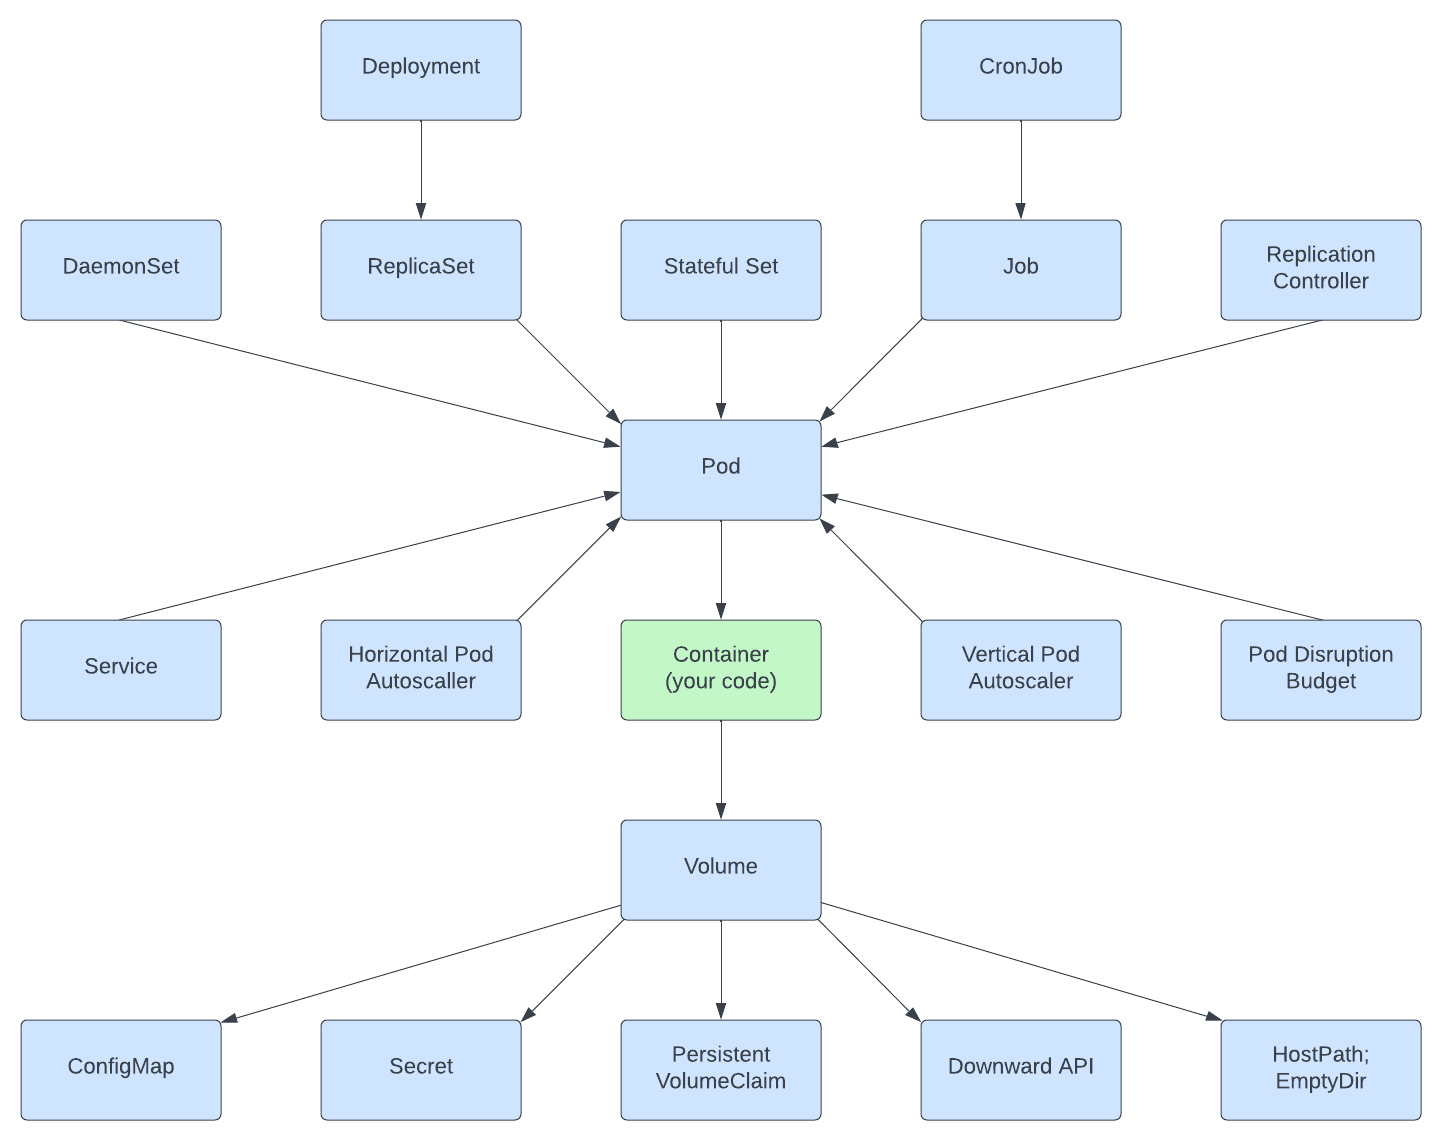
- The most straightforward volume is EmptyDir, which lives as long as the Pod lives, and when the Pod is removed, its content is also lost.
- The Downward API allows passing metadata about the Pod to the containers and the cluster through environment variables and files. We used the same mechanisms for passing application-related data from ConfigMaps and Secrets.
- Use PersistentVolumeClaim and PersistentVolume as permanent storage for the state.
- Volumes are an abstraction to store the state for the ephemeral containers.
- Many workloads have a dynamic nature that varies over time and makes it hard to have a fixed scaling configuration. But cloud-native technologies such as Kubernetes enable the creation of applications that adapt to changing loads. Autoscaling in Kubernetes allows us to define a varying application capacity that is not fixed but ensures just enough capacity to handle a different load. The most straightforward approach to achieving such behavior is using a HorizontalPodAutoscaler (HPA) to scale the number of pods horizontallyHorizontalPodAutoscaler (HPA) to scale the number of pods horizontally.
- Vertical Pod autoscaling is an autoscaling tool to help size Pods for the optimal CPU and memory resources required by the Pods.
- The Service is another simple but powerful Kubernetes abstraction that permanently binds the Service name to an IP address and port number. So a Service represents a named entry point for accessing an application.
- A Pod is the atom of Kubernetes where your application lives.
- A DaemonSet is a controller for running a single Pod on every node. They are typically used for managing platform capabilities such as monitoring, log aggregation, storage containers, and others.
- The ReplicaSet controller is used for creating and managing the lifecycle of Pods expected to run continuously (e.g., to run a webserver container). It maintains a stable set of replica Pods running at any given time and guarantees the availability of a specified number of identical Pods.
- The StatefulSet is the workload API object used to manage stateful applications.
- A Kubernetes Job is similar to a ReplicaSet as it creates one or more Pods and ensures they run successfully. However, the difference is that once the expected number of Pods terminates successfully, the Job is considered complete, and no additional Pods are started.
- The ReplicationController is the predecessor to the ReplicaSet. Don't use the ReplicationController.
The following code deploys a Ghost Blog to the blog namespace.
apiVersion: apps/v1
kind: Deployment
metadata:
  name: blog
  namespace: blog
spec:
  selector:
    matchLabels:
      app: blog
  template:
    metadata:
      labels:
        app: blog
    spec:
      containers:
      - name: blog
        image: ghost:4-alpine
        resources:
          limits:
            memory: "256M"
            cpu: "500m"
          requests:
            memory: "256M"
            cpu: "500m"
        ports:
        - containerPort: 2368
        env:
        - name: url
          value: http://your-blog.com
It can be applied to an existing Kubernetes cluster by running kubectl apply.
kubectl apply -f deployment.yaml
The blog is up and running now, but not accessible, so we must add a load balancer Service.
apiVersion: v1
kind: Service
metadata:
  name: blog
  namespace: blog
spec:
  type: LoadBalancer
  selector:
    app: blog
  ports:
  - port: 80
    targetPort: 2368
    name: http
    protocol: TCP
And apply use kubectl to tell the Kubernetes cluster what we want.
kubectl apply -f loadbalancer.yaml
The last thing on the list is to create a state store. It's not recommended to host a stateful application and it is done here to keep things easy to follow.
Claim a volume in the namespace of the application.
apiVersion: v1
kind: PersistentVolumeClaim
metadata:
  name: blog-content
  namespace: blog
spec:
  resources:
    requests:
      storage: 10Gi
  volumeMode: Filesystem
  accessModes:
    - ReadWriteOnce
  storageClassName: linode-block-storage-retain
Apply it by running kubectl apply -f volume.yaml
Include the volume in the pod spec.
apiVersion: apps/v1
kind: Deployment
metadata:
  name: blog
  namespace: blog
spec:
  selector:
    matchLabels:
      app: blog
  template:
    metadata:
      labels:
        app: blog
    spec:
      containers:
      - name: blog
        image: ghost:4-alpine
        resources:
          limits:
            memory: "256M"
            cpu: "500m"
          requests:
            memory: "256M"
            cpu: "500m"
        ports:
        - containerPort: 2368
        env:
        - name: url
          value: http://your-blog.com
        volumeMounts:
          - mountPath: /var/lib/ghost/content
            name: content
      volumes:
        - name: content
          persistentVolumeClaim:
            claimName: blog-content
Followed by applying the change with kubectl apply -f deployment.yaml